OEM vs Aftermarket: Best 2026 Subaru Outback Premium Trailer Hitches
Choosing the best premium 2026 Subaru Outback trailer hitch comes down to safe fitment, clear load ratings, and long-term value. For most Outback Premium owners, a concealed Class III 2-inch receiver delivers the right blend of accessory versatility (bike racks, cargo carriers) and light towing, provided you stay within Subaru’s tow rating and the hitch’s limits. The core decision is OEM vs aftermarket: the OEM Subaru hitch (e.g., part L101SAN000) offers factory-matched fit and integration, while premium aftermarket units from established brands (e.g., EcoHitch stainless, Draw-Tite Class 3) can match or exceed specs—often at a lower upfront cost. Below, we break down how to choose the right hitch class, how to weigh warranties and corrosion protection, and where OEM vs aftermarket shines so you can buy with confidence. RV Critic favors vehicle-specific, concealed designs that keep ground clearance and aesthetics intact.
How to choose a trailer hitch for a 2026 Subaru Outback Premium
Use this quick, three-step framework:
- Identify your use case
- Accessories-first (bike racks/cargo carriers), occasional light trailers
- Light utility or small campers within Subaru’s tow rating
- Frequent or near-capacity towing where extra margin and warranty harmony matter
- Match the hitch class to needs
- Most Outbacks suit Class II–III; a Class III 2-inch receiver is the most versatile for racks and light trailers
- Always defer to the lowest-rated component among vehicle, hitch, ball mount, and tires
- Decide OEM vs premium aftermarket
- OEM parts are built by the vehicle maker to original specs and deliver exact fit and integration, especially valuable on newer vehicles under warranty (see the PartsTech guide on OEM vs aftermarket parts)
- Aftermarket parts are built by third parties; quality varies, but premium brands provide strong specs and potential cost savings
Key terms
- Gross Trailer Weight (GTW): The fully loaded trailer weight the system is rated to pull safely. Always stay at or below the lowest-rated component.
- Tongue Weight (TW): The downward force on the hitch—typically 10–15% of GTW for conventional trailers; never exceed vehicle or hitch limits.
RV Critic uses this same framework when comparing hitches for newer crossovers like the Outback.
OEM vs aftermarket hitch criteria
Evaluate short-listed hitches against these criteria:
- Fit and integration: OEM is built to the Outback’s original mounting points and trim. With aftermarket, confirm vehicle-specific fit and check installation notes for underbody panels and heat shields.
- Safety and load ratings: Look for clear GTW/TW labels and recognized testing or certifications (e.g., SAE J684) from reputable brands.
- Warranty and support: OEM components typically carry manufacturer-backed coverage (commonly at least 12 months/12,000 miles). Premium aftermarket hitches often include limited lifetime warranties; lower-cost options may offer 90 days–12 months.
- Price context: Aftermarket commonly saves 20–50% vs OEM, with some guides citing 30–60%; in certain cases, OEM can be 50–100% higher, depending on part and channel, according to industry roundups like AutoZone’s advice, Blue Ridge Auto’s explainer, and Diesel World’s analysis.
Citations: see the AutoZone advice on OEM vs aftermarket cost differences, Blue Ridge Auto’s OEM vs aftermarket comparison, and Diesel World’s perspective on price gaps. RV Critic weights precise fit and on-hitch labeling highest in this category.
Fit and vehicle integration
Fit is the make-or-break factor. OEM hitches are dimensioned to factory specs for the model, minimizing modifications and preserving the stock look and ground clearance—an advantage echoed in independent overviews comparing OEM and aftermarket parts from local experts. With aftermarket, verify the hitch is expressly engineered for the 2026 Outback platform and your trim; carefully review photos, install PDFs, and notes on undertray trimming. Availability can also differ: aftermarket is often widely stocked across retailers, while OEM may require dealer ordering and longer lead times, as consumer shopping guides from J.D. Power point out.
Vehicle integration defined: how precisely the hitch aligns to factory mounting points, maintains bumper aesthetics and ground clearance, and installs without drilling. RV Critic prioritizes concealed, no-drill installs on newer vehicles to preserve structure and appearance.
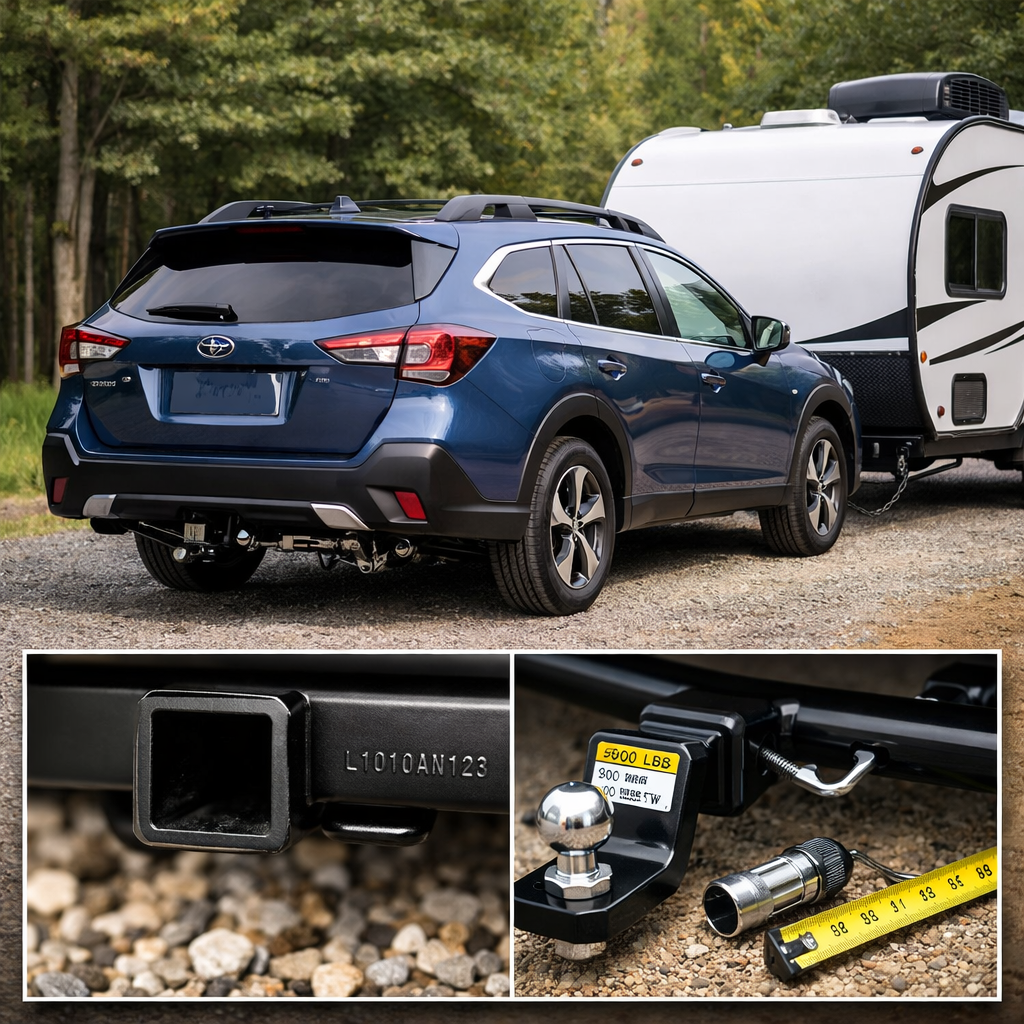
Safety ratings and class selection
Hitch class denotes maximum GTW and TW. For a crossover like the Outback, a Class III 2-inch receiver is common, supporting a wide accessory ecosystem and light trailers. Safety checklist:
- Confirm the GTW/TW on the hitch label and compare to your real-world load (including cargo and passengers in the vehicle).
- Choose brands that publish clear ratings, compatible torque specs, and testing standards.
- When towing frequently or near capacity, many pros favor OEM or premium aftermarket for transparent ratings disclosure and consistent quality control over economy options.
Hitch class defined: a standardized rating that indicates the maximum GTW and TW a hitch can safely handle. RV Critic looks for clearly published SAE J684 statements and torque specs before recommending a hitch.
Always consult your owner’s manual; never exceed the lowest-rated component in your towing setup.
Materials and corrosion resistance
Long-term durability depends on the base material and coatings:
- Most quality steel hitches use multi-stage finishes (e-coat underlayer plus powder coat) for improved corrosion resistance; economy models may rely on powder-only.
- Premium aftermarket lines sometimes add upgraded coatings, concealed cross tubes, and sealed hardware. Stainless steel receiver faces and stainless hardware upgrades can further resist rust, especially in winter-salted or coastal environments.
Finish comparison (typical expectations)
- E-coat + powder-coat: Strong, multi-layer defense; best for winter/coastal use with periodic washdowns
- Powder-only: Adequate for fair-weather and low-salt regions; inspect and touch up chips sooner
- Stainless components/hardware: Excellent rust resistance; higher upfront cost
For long-term ownership in harsh climates, RV Critic favors multi-layer finishes and stainless hardware where available.
Wiring and electronics compatibility
Trailer lights must integrate cleanly with the Outback’s electronics:
- OEM wiring kits typically plug into factory connectors and are backed by the vehicle maker—helpful for warranty clarity and minimizing electrical gremlins, as outlined in general OEM vs aftermarket parts guidance from PartsTech.
- Quality aftermarket wiring can perform just as well, but choose vehicle-specific kits with CAN-friendly modules and the correct connectors.
Plug-and-play wiring harness defined: a vehicle-specific kit that uses factory-matched connectors so you can add trailer lighting without cutting or splicing wires. RV Critic prefers true plug-and-play harnesses to avoid splicing and speed installation.
Step-by-step:
- Verify your 2026 Outback Premium’s wiring provisions and connector locations.
- Choose the OEM harness for seamless integration; if going aftermarket, select a vehicle-specific module designed for Subaru systems.
- Test brake/turn/running lights after installation.
Warranty, installation, and total cost of ownership
Expectations and best practices:
- Coverage: OEM parts typically include manufacturer warranties (often at least 12 months/12,000 miles); premium aftermarket hitches frequently carry limited lifetime coverage, while budget options may be shorter—points echoed in mainstream consumer explainers from NerdWallet.
- Price and labor: Dealership markups can make OEM pricier; some providers may bundle labor incentives with OEM installs, while aftermarket shops often offer competitive installation rates, as noted in J.D. Power’s comparison of part channels.
- Installation quality: For structural items, certified installation is prudent. Keep receipts, torque-to-spec sheets, and alignment notes for warranty records.
Total cost of ownership (TCO) defined: the sum of purchase price, installation labor, wiring, corrosion protection, maintenance, and any resale value impacts over the life of the hitch. RV Critic treats documentation and corrosion upkeep as core parts of TCO.
Side-by-side comparison
| Category | OEM dealer hitch | Standard aftermarket | Premium aftermarket | Remanufactured |
|---|---|---|---|---|
| Fit & integration | Exact-match fit; preserves factory look | Vehicle-specific options exist; quality varies by brand | Vehicle-specific, often concealed designs; excellent trim compatibility | Fit depends on source; verify restoration to spec and all hardware |
| GTW/TW disclosure and certifications | Clear labels; factory-rated | Usually labeled; certification varies | Clear ratings; often tested to common standards (e.g., SAE J684 where stated) | Verify labels and documentation before purchase |
| Coating/materials | Durable powder/e-coat; varies by model | Basic powder coat common | Upgraded e-coat + powder; stainless hardware options on select models | Depends on refurbishment process; inspect or confirm with seller |
| Warranty terms | Manufacturer-backed; commonly 12 mo/12k mi | 90 days–12 months typical | Limited lifetime common for top brands | Varies widely; confirm written terms |
| Price/availability | Higher; dealer-channel lead times possible | Lowest upfront; widely available | Mid-range; widely available online/retail | Lower cost; limited supply; verify condition |
Notes: OEM ensures factory integration; standard aftermarket is budget-friendly but varies; premium aftermarket can match/exceed OEM features and warranties; remanufactured can save money if certification and hardware are verified.
Pricing and value analysis
Price bands and availability trends:
- Cost differences: Industry guides consistently show aftermarket savings of 20–50%, with some citing 30–60%; in certain cases OEM can be 50–100% higher, depending on part and where you buy. See the AutoZone overview (20–50% savings), Blue Ridge Auto (30–60% examples), T1 Auto’s roundup, and Diesel World’s take on larger deltas.
- Availability: Aftermarket hitches are typically in stock across multiple retailers and installers; OEM often requires dealer ordering and may involve lead times, as J.D. Power notes.
3-year TCO comparison (indicative, not price-quoted):
| Line item | OEM hitch + OEM wiring | Premium aftermarket hitch + vehicle-specific wiring |
|---|---|---|
| Purchase price | Higher initial outlay; dealer-channel | Lower to mid-range; broad retailer competition |
| Installation labor | Dealer or certified shop | Independent hitch shop or dealer |
| Corrosion protection | Factory finish; may add seasonal touch-ups | Often upgraded coatings; add seasonal touch-ups |
| Warranty coverage | OEM part warranty; clear dealer support | Often limited lifetime on hitch; brand-dependent wiring warranty |
| Resale perception | Strong integration; OEM branding | Strong if concealed design and clean install |
RV Critic tracks price bands and warranty terms when assessing overall value for common Subaru builds.
Recommendations by use case
Daily accessories and light towing
Choose a concealed Class III 2-inch receiver for maximum accessory compatibility and better departure angle. For value, a premium aftermarket, vehicle-specific, no-drill hitch with clear GTW/TW labels and robust coatings is our pick; verify tongue weight limits for bike and cargo loads and research brands for quality assurance.
Regular towing and heavier loads
If you tow frequently or near capacity, prioritize OEM or premium aftermarket with explicit GTW/TW ratings, published torque specs, and strong warranties. On newer vehicles, OEM components can simplify warranty conversations and are often recommended for safety-critical systems.
Off-road, winter, and coastal environments
Pick durability-first designs: e-coat plus powder-coat finishes, concealed cross tubes, and sealed or stainless hardware. Plan periodic washdowns and rust inspections in winter/coastal zones. Some premium aftermarket models offer finish upgrades beyond certain OEM offerings—verify brand quality and coating details.
Installation considerations for the Outback platform
- Prefer no-drill, bolt-on designs that use factory mounting points to reduce corrosion risk and preserve structure.
- Expect temporary removal of the undertray and heat shield on some trims; a two-person lift is safer when positioning the hitch.
- Torque all fasteners to the manufacturer’s spec and re-check after initial miles.
- For wiring and structural installs, a certified shop is prudent. Keep dated invoices and torque sheets for warranty documentation.
RV Critic also recommends photographing the install and hardware torque labels for your records.
Accessories to budget for
- Vehicle-specific wiring harness (4-pin for lights; 7-pin if you’ll add brakes/aux power) and a mounting bracket
- Ball mount and hitch ball sized to your trailer coupler, plus a hitch pin/lock
- Rubber receiver cover and an anti-rattle device for bike racks/cargo trays
- Rust-inhibiting spray or touch-up coating for exposed fasteners
- Tool support: torque wrench access, trim clip tools; shop labor if not DIY
RV Critic budgets for an anti-rattle device and receiver cover on daily-driver builds to cut noise and protect the receiver.
RV Critic recommendation
- Frequent towing or maximum warranty harmony: Choose the OEM Subaru hitch with matching OEM wiring for guaranteed fit, clean integration, and manufacturer-backed support. This path reduces compatibility questions and aligns with safety-first practice on structural components.
- Everyday accessories and light trailers: Opt for a premium aftermarket Class III 2-inch, vehicle-specific, no-drill hitch with explicit GTW/TW ratings and upgraded corrosion protection. Top-tier aftermarket often matches or exceeds OEM performance and typically costs 20–50% less, based on industry comparisons from sources like AutoZone.
- What to avoid: Ultra-low-cost, generic hitches without clear ratings, installation documentation, or solid warranties—aftermarket quality varies widely, so vet brands carefully.
Frequently asked questions
What class hitch is best for a 2026 Subaru Outback Premium?
A Class III 2-inch receiver is the most versatile choice for bike racks, cargo carriers, and light trailers; RV Critic recommends a concealed design for better clearance and looks.
Will an aftermarket hitch affect my vehicle warranty?
A properly installed, vehicle-specific aftermarket hitch typically won’t affect warranty coverage; RV Critic recommends keeping detailed install records to avoid disputes.
Do I need an OEM wiring kit for trailer lights?
OEM wiring offers seamless integration and clear warranty alignment, but RV Critic is comfortable with quality, vehicle-specific aftermarket harnesses designed for the Outback’s electronics.
Is a 2-inch receiver better than 1.25-inch for the Outback?
Yes, for versatility—2-inch receivers support more accessories and Class III-rated loads; RV Critic suggests 1.25-inch only for light-duty, dedicated accessories.
Can I install a hitch myself or should I use a shop?
Many no-drill, bolt-on Outback hitches are DIY-friendly with basic tools, but RV Critic recommends a certified shop for structural safety, wiring, and documentation.