Expert Checklist: RV Receiver Class, Tongue Weight, Ground Clearance for Towing
Choose the best RV receiver hitch for variable terrain by matching receiver class to your actual loaded trailer weight, setting tongue weight in the 10–15% band, leveling the trailer with the correct rise/drop, and protecting hitch ground clearance. Add weight distribution and sway control when rear sag or crosswinds reduce stability, and always size to the lowest-rated component. This RV Critic guide turns those decisions into a short, repeatable process so you tow straighter, brake more confidently, and avoid hitch strikes on driveways, ruts, and off-camber sites.
RV Critic
Our road-tested approach is simple: verify, measure, adjust, recheck. It’s how full-time and family RVers get safer towing, less sway, fewer ground strikes, and easy hitch class matching. We translate real-world variables—receiver class, tow capacity, tongue weight calculator use, hitch ground clearance, weight distribution hitch setups, and anti-sway—into actions you can do in the driveway. We favor driveway-friendly steps you can repeat before every trip.
How to use this checklist:
- Read in order. Start with ratings, then weights, then height/clearance.
- Verify every rating on vehicle, hitch, and mount. Lowest rating wins.
- Measure GTW and tongue weight after packing, adjust cargo, and recheck.
- Reconfirm height/clearance after any changes to load or suspension.
Receiver class selection
Receiver class is a standardized rating based on receiver size and its allowable Gross Trailer Weight (GTW) and Tongue Weight (TW). It matches the receiver opening to typical loads and ball mounts. A higher-class hitch never increases your vehicle’s tow rating—your safe limit is whatever part in the system is rated the lowest, per the CURT hitch class standards.
| Hitch Class | Receiver Size | Typical Max GTW | Typical Max TW | Common Use Cases |
|---|---|---|---|---|
| Class I | 1¼ in | 2,000 lb | ~200 lb | Small utility, bike racks |
| Class II | 1¼ in | 3,500 lb | ~350 lb | Small boats, pop-ups |
| Class III | 2 in | ~8,000 lb | ~800 lb | Many travel trailers, SUVs/½-ton trucks |
| Class IV | 2 in | ~10,000 lb | ~1,000 lb | Heavier travel trailers, ½–¾-ton trucks |
| Class V | 2.5–3 in | ~18,500–21,000 lb | 2,400–2,700 lb | Heavy equipment, large toy haulers |
Selection tips:
- Start with your loaded trailer weight (not brochure “dry” weight).
- Pick the smallest class that safely exceeds your GTW/TW, while obeying the vehicle’s ratings.
- If you frequently tow on rough roads, prefer a class with extra margin for dynamic loads.
Tongue weight targets
Tongue weight is the downward force the trailer applies to the hitch ball. Too little and the trailer hunts and sways; too much and the tow vehicle sags, steering lightens, and braking lengthens, as explained in ProPride towing safety guidance.
Aim for 10–15% of loaded GTW:
- TWmin = GTW × 0.10
- TWmax = GTW × 0.15
Quick example: If your loaded trailer (GTW) is 6,500 lb, target TW is 650–975 lb. Stay within this band and below all rated limits.
What you’ll notice if it’s off (and how to fix it):
- Low TW (under ~10%): sway in crosswinds, “tail wag,” light trailer brakes. Move weight forward, lower cargo behind the axle, or reduce rear overhang cargo.
- High TW (over ~15%): rear squat, light steering, headlight glare, porpoising. Shift weight aft slightly, remove front storage mass, or consider WD.
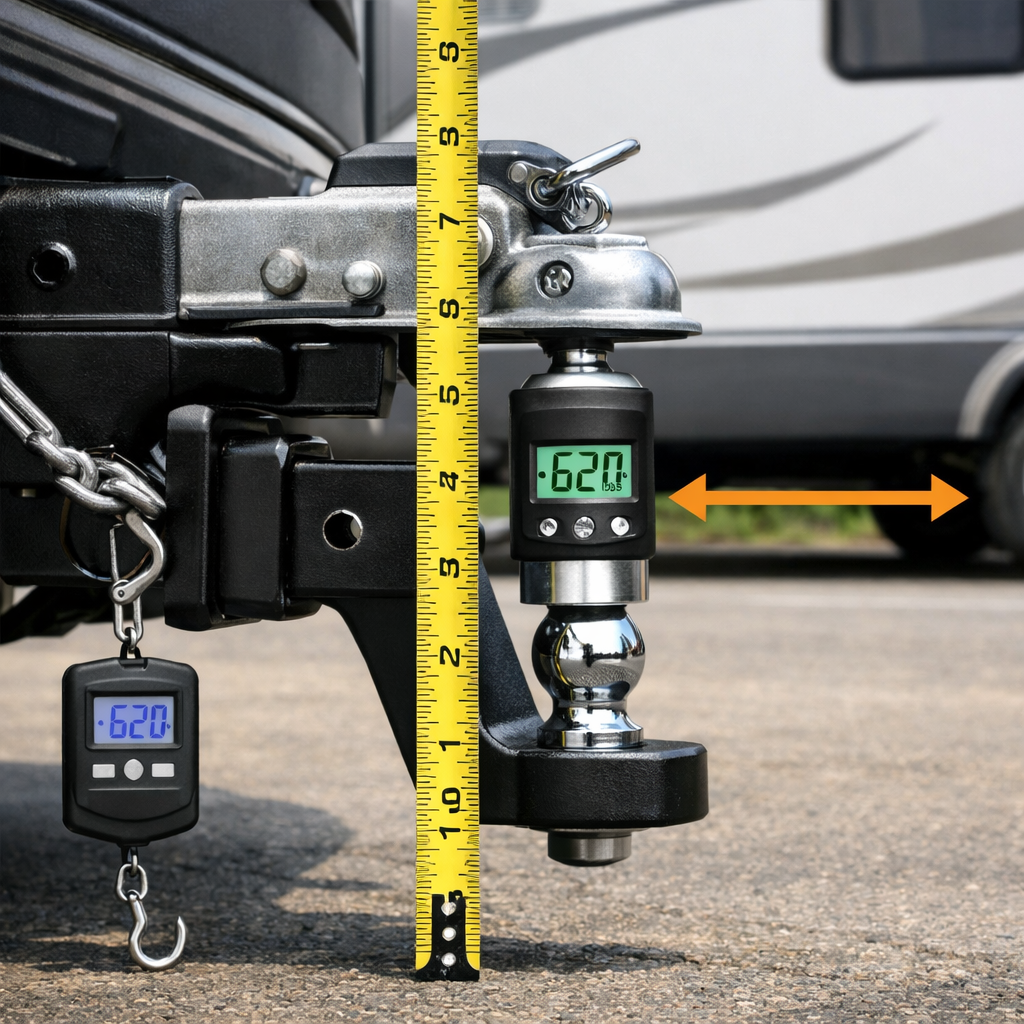
Measuring tongue weight
Verification beats estimation—measure after the RV is packed.
Methods you can trust:
- Portable tongue-weight scale: fast and good for repeat checks.
- Integrated hitch gauge: convenient, always-on feedback.
- Commercial truck scales (CAT-style): most precise for full GTW; use the difference method to infer TW if needed.
Step-by-step weigh flow:
- Load the RV as you’ll travel (water, propane, bikes, tools).
- Determine GTW from a scale or from manufacturer weight plus cargo.
- Calculate your TW target band (10–15% of GTW).
- Measure actual TW with a scale or integrated gauge.
- Adjust cargo position, re-measure, and record final numbers.
- Recheck after any layout or gear changes—small moves can shift TW meaningfully.
Weighing after packing validates your real-world numbers and keeps you honest about capacity—a core RV Critic habit.
Weight distribution and sway control
Weight distribution (WD) hitches transfer some hitch load to the tow vehicle’s front axle and the trailer’s axles, improving balance, reducing pitch, and enhancing highway stability—especially valuable on grades and in gusty crosswinds, as outlined in the Heartland RVs towing guide.
When to use WD and/or sway control:
- Add WD when TW and/or trailer length cause rear sag, light steering, or vague braking feel.
- With properly set WD, many setups settle near the low end of the 10–15% TW band while maintaining control.
- For heavier travel trailers, choose WD with integrated anti-sway.
- For light, short trailers, standalone friction sway control can be sufficient.
Adjustable rise and drop
Your goal is a level trailer on the road. An adjustable ball mount makes it easy to set precise rise/drop, but always confirm the mount and ball ratings match your needed GTW/TW.
Quick setup flow:
- Measure receiver height (tow vehicle, unloaded) to the inside top of the receiver.
- Level the trailer and measure coupler height to the coupler bottom.
- Required rise/drop = receiver height − coupler height (drop if positive, rise if negative).
- Choose a mount with adequate rise/drop and the correct ball size and ratings.
- Recheck with the trailer fully loaded and coupled; adjust one notch if needed to restore a level stance.
Note: Small height errors can nudge TW outside your target and reduce ground clearance.
Ground clearance benchmarks
Hitch clearance prevents curb and driveway strikes. Use these benchmarks from the Weigh Safe towing guide:
- Unloaded (no trailer) hitch clearance: at least 13 inches.
- Loaded and coupled clearance: no less than 11 inches at the lowest point (drawbar/shank).
A quick planning rule: required drop + ~3 inches for hardware approximates how much the ball mount hangs below the receiver. Example: If you need a 6-inch drop, expect ~9 inches of hang. If the receiver bottom sits 20 inches off the ground, estimated coupled clearance is ~11 inches—enough for most driveways. Confirm with a slow driveway test and watch the drawbar, shank, and safety chains over transitions.
Hitch hardware and components
Choose parts that match your use and avoid weak links. The safe limit is the lowest-rated component—receiver, ball mount, hitch ball, WD head/bars, shank, pin/clip, and safety chains—so verify each rating and size, as summarized in the OnAllCylinders hitch class guide.
Receiver sizes and typical use:
- 1¼ in: light duty (Class I–II).
- 2 in: most travel trailers (Class III–IV).
- 2.5–3 in: heavy trailers and ¾–1-ton trucks (Class V).
Remember: Propane bottles, batteries, toolboxes, bike racks, generators, and WD hardware all add to tongue weight—count them.
Tow vehicle ratings and limits
Know the numbers before you roll:
- GVWR: maximum loaded weight of the RV or tow vehicle.
- GCWR: max combined weight of tow vehicle plus trailer.
- Payload capacity: GVWR minus curb weight (the vehicle with standard equipment and fluids, not “dry” weight), per the USA Trailer weight ratings guide.
- Practical payload includes you, passengers, pets, cargo, hitch hardware, and tongue weight—it goes fast, as the KYD payload guide highlights.
Quick math flow:
- Verify vehicle GCWR and GVWR from the door sticker/owner’s manual.
- Subtract actual tow vehicle weight (with people/cargo) from GCWR to find remaining towing capacity.
- Confirm your hitch class and measured TW fit within both vehicle and hitch ratings.
- Apply the rule: the lowest rating wins—exceeding any limit risks failures, citations, and poor braking control. Weigh to be sure.
Off-road and variable terrain considerations
Rough approaches and uneven campsites amplify clearance and stability needs.
- Target ≥11 inches loaded clearance; use shorter-overhang ball mounts to improve departure angle.
- Consider WD with integrated sway for washboard roads or crosswinds; it helps keep steering planted on grades.
- Load heavy items low, centered, and slightly forward of the axle to maintain stable TW and reduce roll on ruts.
- For very heavy trailers, bed-mounted fifth-wheel/gooseneck designs place weight over the axle and are common in the 10,000–30,000 lb range when properly matched—well-suited to rough roads when set up correctly.
Pre-trip inspection checklist
- Verify GTW and TW are within the 10–15% band and under all rated limits; re-measure if cargo changed.
- Confirm receiver class, correct ball size, mount/ball ratings, and pin/clip engagement; torque the hitch ball to spec.
- Check loaded ground clearance (≥11 inches) and that drawbar/shank and safety chains clear breakover points.
- Inspect safety chains, breakaway cable, 7-way wiring, trailer brakes, and WD/sway bar tension.
- Set tire pressures (tow vehicle + trailer), adjust mirrors, and test the brake controller at low speed.
Frequently asked questions
What receiver class do I need for my travel trailer?
Most travel trailers pair with a Class III or IV hitch; Class III 2-inch receivers typically handle up to ~8,000 lb, while Class IV often rates to ~10,000 lb. Use the RV Critic checklist to match this to your actual loaded weight and vehicle ratings.
How do I calculate safe tongue weight for my setup?
Multiply your loaded GTW by 10–15% to get a safe tongue weight range, then measure and adjust cargo to stay within the band and below all ratings. RV Critic’s process keeps this quick and repeatable.
Do I need a weight distribution hitch or just sway control?
Use weight distribution when TW or trailer length causes rear sag or light steering, and add integrated sway control for highway stability; small, light trailers may be fine with friction sway alone. RV Critic recommends setting up and test-driving, then fine-tuning tension.
How much ground clearance is enough when towing?
Target at least 13 inches unloaded and no less than 11 inches loaded at the hitch to reduce bottoming on driveways and uneven terrain; recheck after rise/drop or cargo changes. The RV Critic clearance check makes this simple.
Does upgrading the hitch increase my vehicle’s tow capacity?
No. A higher-class hitch doesn’t change your vehicle’s ratings—the safe limit is always the lowest rating among vehicle, hitch, and ball mount. RV Critic’s rule: the lowest rating wins.