Avoid Fines: Where to Legally Dump RV Waste in 2026
Staying compliant with wastewater rules protects waterways, avoids expensive penalties, and keeps your trip on schedule. The safest, most legal way to empty RV black and gray tanks is to use authorized dump stations at campgrounds, municipal facilities, or vetted private sites—and to verify access and fees before you arrive, a practice RV Critic recommends. This guide shows you exactly where you can dump, how to plan stops, and the right gear and sequence to use. You’ll find quick options, a decision table, and a step-by-step procedure so you can empty tanks cleanly, quickly, and confidently on every leg of your 2026 travels.
Why legal dumping matters
Illegal dumping is the discharge of RV black or gray water into streets, gutters, storm drains, onto the ground, or into any non-sewer receptacle. It is illegal nationwide and can trigger fines, cleanup liability, and even trip delays if you’re cited. Industry guidance notes fines can exceed $1,000 and cautions against using bleach-based cleaners that harm wastewater systems, too (see Roamly’s at-home dumping guide). When boondocking, pack out all trash—BLM and USFS do not allow on-site disposal on dispersed lands (see these boondocking disposal rules). Staying within environmental compliance isn’t just courteous; it’s the law. RV Critic’s stance is straightforward: use only sanitary systems and posted dump stations.
Know your legal options
Here’s a quick menu of compliant places to empty tanks, with what to expect.
- RV parks and campgrounds: The most reliable choice. Full hookups or a shared dump lane; access may be included for guests and available to non-guests for a small fee. Expect posted hours and clear instructions.
- County transfer stations and municipal sites: Often low-cost or free, but policies vary by location—always call first to confirm public access and hours.
- Truck stops (Pilot, Flying J, Love’s): Many offer paid dump stations at select locations; availability and fees vary by site. Expect card payment and posted rules.
- Rest areas and state facilities: Some states provide free dump stations; check current listings and seasonal status (see RV LIFE’s guide to dump locations).
- RV dealerships and service centers: Some allow dumping as a courtesy; permission is required and availability changes with service schedules.
- Mobile pump-out services: On-site pumping is convenient at campsites, storage lots, or driveways; pricing typically runs about $50–$75+ per visit (see Home and mobile solutions below).
- Home options (where allowed): A home sewer cleanout, a portable “tote” tank for transport, or a macerator-to-toilet setup can be legal if tied to a sanitary sewer and local ordinances permit it (see Home and mobile solutions).
Decision snapshot: choose based on cost, predictability, and access
| Option | Typical cost | Hours predictability | Access notes |
|---|---|---|---|
| RV park/campground | Included or $5–$15 | High (posted/office) | Guests prioritized; non-guest fees |
| County/municipal site | Free–low cost | Medium (varies widely) | Public access policies differ |
| Truck stop | $8–$12 (site-specific) | High (24/7 at many) | At select locations only |
| Rest area/state facility | Often free (limited) | Medium (seasonal closures) | Limited states; verify listings |
| RV dealer/service center | Usually fee or courtesy | Low–medium | Permission required |
| Mobile pump-out | ~$50–$75+ per visit | High (appointment) | Best for long stays or no access |
| Home sewer cleanout | Usually free | High (your schedule) | Must be tied to sanitary sewer |
Plan your route and locate stations
Pre-map legal stops so you’re never forced into a bad choice. Before departure, search along your route in Google Maps for terms like “transfer station,” “landfill,” or “solid waste facility,” and save candidates. Use RV Critic’s route-planning guidance alongside discovery tools such as Campendium, Sanidumps.com, iOverlander, AllStays, and RVdumpsites. RVdumpsites’ map supports offline caching of nearby dump stations—a big help when your signal fades (see the RVdumpsites map).
A quick waypointing flow:
- For each travel leg, find 2–3 dump options near your fuel/grocery stops.
- Save pins in your maps app and add notes for hours, fees, and access gates.
- Arrange stops to hit empty/ fill/ fuel in one exit to reduce detours.
Verify access, hours, and fees
RV Critic recommends a two-minute check to prevent wasted miles. For municipal or transfer sites, call to confirm public access, hours, and any ID or payment requirements. For truck stops and rest areas, verify location-specific availability, posted fees, and whether water is non-potable or potable. If sites require codes or wristbands, note that in your map pins.
Combine fuel, water, and dump stops
Cluster errands to save time and money:
- Plan to dump when you’re already stopping for fuel.
- Top off freshwater and use non-potable rinse water at the same exit, if provided.
- Add propane and groceries nearby to avoid extra miles.
Quick exit checklist:
- Fuel
- Non-potable rinse water
- Freshwater fill
- Trash drop
- Restrooms
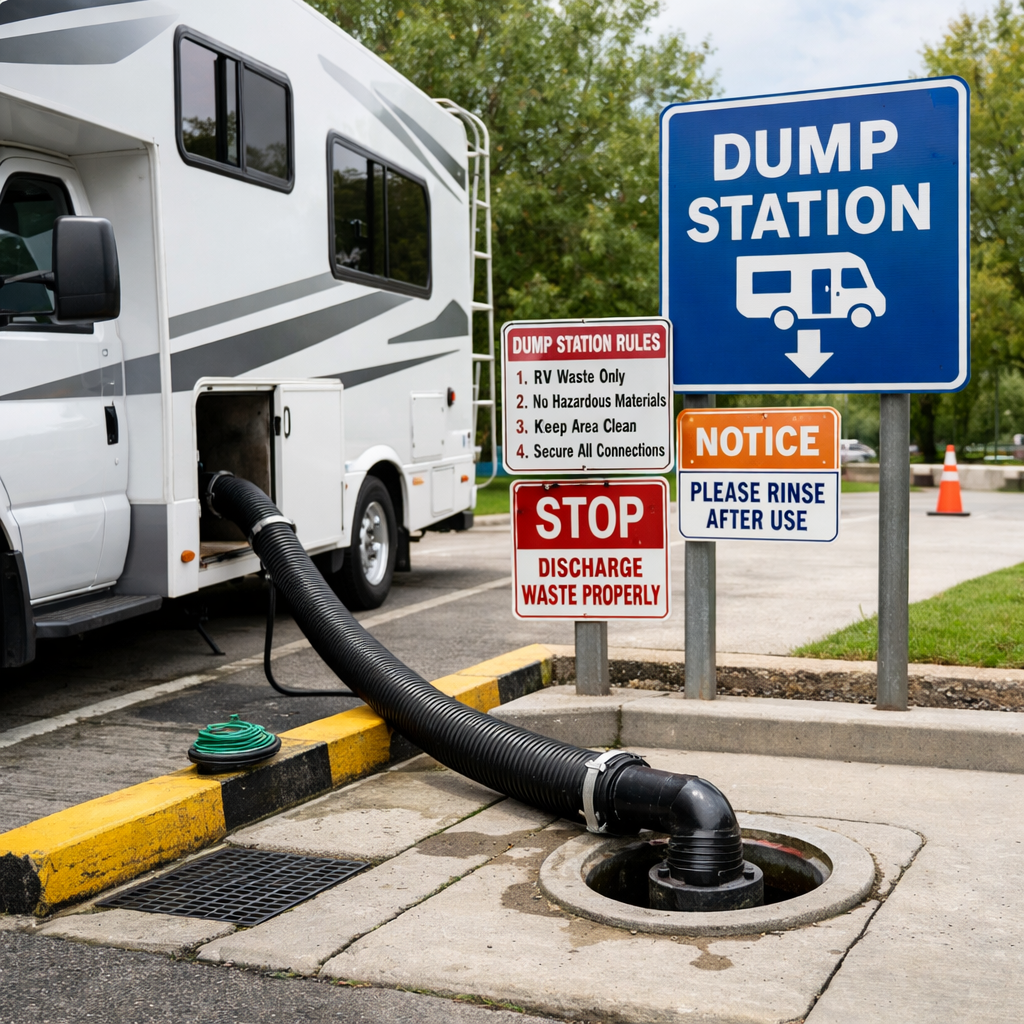
Dump correctly and safely
Your RV has two wastewater tanks: the black tank stores toilet waste; the gray tank holds sink and shower water. Both must be emptied only at authorized dump stations using a sealed sewer hose, in this order: black first, then gray, which helps rinse the shared hose and fittings (see the RVshare dump-station guide). Wear PPE (gloves), use a clear connector to monitor flow, and keep a separate non-potable hose for rinsing.
Set up and connect
- Park with the outlet close to the inlet; chock wheels if needed.
- Don gloves and attach your RV sewer hose securely, using a clear elbow connector to see when flow starts and stops.
- Connect the other end to the site inlet; weigh it down if needed.
- Use only a dedicated non-potable hose for rinsing sewer gear—never your drinking-water hose.
Empty black then gray
- Open the black tank valve first and let it drain fully; watch the clear connector to confirm flow has stopped.
- Close the black valve, then open the gray valve to rinse the hose with soapy gray water.
- When flow stops, close the gray valve.
Rinse, sanitize, and stow
- With the separate non-potable hose, rinse the sewer hose and fittings before disconnecting.
- Close all tank valves before replacing caps to prevent leaks, pests, and odors.
- Avoid bleach-based cleaners that can damage wastewater systems and harm treatment processes; use RV-safe tank treatments instead (noted in Roamly’s at-home dumping guide).
Home and mobile solutions
- Sewer cleanout: The simplest compliant home option is a sewer cleanout tied to your municipal sanitary sewer; confirm local ordinances and HOA rules first (see Roamly’s guidance above).
- Portable waste tanks: A 20–40 gallon “tote” lets you shuttle waste to a legal dump point when you can’t bring the rig; typical cost runs about $150–$300 and works well for apartment or HOA limits.
- Mobile pump-out service: Ideal for sensitive sites or long stays; expect roughly $50–$75+ per visit, scheduled like a propane delivery.
Boondocking and public land rules
When dispersed camping, pack out all trash—on-site disposal is not allowed under BLM and USFS policies (see the link in Why legal dumping matters). Call the relevant district office ahead about any public-use dumpsters or seasonal guidance. Primary disposal points for boondockers include highway rest areas, county transfer stations, and paid campground dumpsters.
Etiquette at dump stations
- Keep it moving: If a line forms, skip lengthy black-tank flushes; that’s poor etiquette and slows everyone down (see Winnebago dump-station tips).
- Use provided trash cans sparingly; don’t unload a week’s worth into a single can at a truck stop.
- Clean up: Rinse any spills, replace caps and covers, and pull forward before reorganizing hoses or gloves.
Cost, receipts, and record keeping
Expect truck stop dump fees around $8–$12 at select locations, with some rest areas free depending on state and season (see Escapees’ dump-station roundup). RV Critic recommends keeping receipts—paper or photos—and noting location, time, and fees in a simple log. It helps with budgeting, dispute resolution, and future route planning.
Suggested log template:
| Date | Location | Fee | Water fill (Y/N) | Notes (access code, hose condition, hours) |
|---|
Troubleshooting common issues
- Slow flow or clogs: Confirm the valve is fully open; use your tank flush if available and watch the clear elbow to verify flow resuming.
- Cross-contamination risk: Never use your freshwater hose to rinse sewer gear; carry a separate non-potable hose.
- Odors after dumping: Ensure valves are closed, add tank treatment, and avoid bleach products that can damage seals and wastewater systems.
Frequently asked questions
How can I find legal dump stations near me?
Start with RV Critic’s guidance, then use reputable RV apps and maps to locate nearby dump stations and call to confirm hours and fees. Some tools also offer offline maps for weak-signal areas.
What are the penalties for illegal dumping?
Penalties vary by jurisdiction, but dumping into storm drains or on the ground can trigger $1,000+ fines plus cleanup liability. It’s safer to use authorized dump stations and keep receipts as proof of legal disposal.
Can I dump RV waste at home legally?
Yes, if you connect to your home’s sewer cleanout or another approved sanitary connection and local ordinances allow it; confirm with your city’s wastewater utility.
Do rest areas and truck stops have dump stations?
Some do. Many truck stops offer paid dump stations, and a minority of state rest areas provide free dumps—always verify availability and hours.
What should I bring to a dump station?
Bring a sewer hose with a clear connector, rubber gloves, a dedicated non-potable rinse hose, tank treatments, and disinfecting wipes or spray for cleanup.